Luscious Vegan Cheesecake

I simply adore this recipe!  Last Christmas, I was casting around, searching for a grain free and dairy free recipe for my Mum. As it was for Christmas, I really wanted something luxurious. Something decadent. And I hit the jackpot when I discovered this gem.  (Even more so when I tweaked it into an adult, boozy version, heh heh!)

And if by some chance you are an ex-pat, teaching English in far flung Asia and living in a tiny apartment with no oven, I have good news! This is a no bake cheesecake. Instead it sets in the freezer.Callooh callay! Hip hip hooray!!

This year, my vegan baby sister is home for Christmas, and I can’t wait to see her reaction to these mouth watering morsels!

Prep Time: 1 hr 30 mins         Serves: 24

Ingredients:

For the Crust:

2 cups / 400g pitted dates (soaked for 10 minutes)

2 cups / 400g raw almonds

For the Filling:

1.5 cups / 300g cashews (soaked in boiling water for 1 hour)

1 large lemon, juiced (approx 1/4 cup)

1/3 cup / 75ml coconut oil (melted)

1/2 cup + 2 tblspn full coconut milk (approx 200ml)1

1/2 cup agave nectar or maple syrup

Optional Added Flavours:

2 tblspn Peanut Butter

1/4 cup of blueberries (Fresh or frozen)

3 tblspn caramel sauce

Or my personal favourite……..

1/3 cup of Baileys


Method:20161221_204511

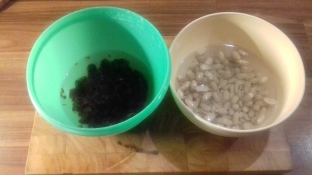
  1. Soak the dates in a small bowl for 10 minutes. At the same time, in another bowl, start the cashews soaking in boiling water for 1 hour.
  2. Add the dates to a food processor and blend until blitzed to small bits. Remove and set aside.20161221_212251
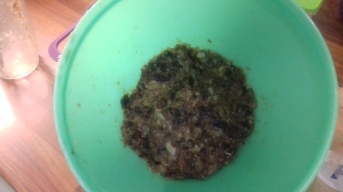
  3. Add the almonds and grind until coarse. Reintroduce the dates and blend until a loose dough is formed.
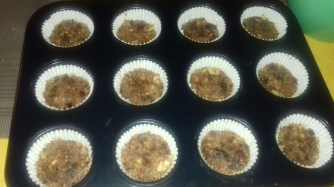
  4. Line two 12 muffin pans with baking cases.
  5. Scoop 1 heaped tablespoon of crust and press into the muffin cups with your fingers. Use a spoon or a shot glass to press down and compact the base. Place in the freezer to firm up.20161221_215056
  6. When the cashews have finished soaking, add all the filling ingredients to blender and mix until smooth.  At this point it is very important to taste the mix. You may need to adjust it by adding extra coconut milk or sweetener to suit your preference.20161221_231747
  7. Now add your chosen flavour. (or flavourS if you wish to divide your filling and try two or three different flavour groups)
  8. Divide the filling evenly among the muffin pans. Tap the trays on the counter top a few times to release any air bubbles. Cover the muffin pan with plastic wrap / cling film.  20161221_232740
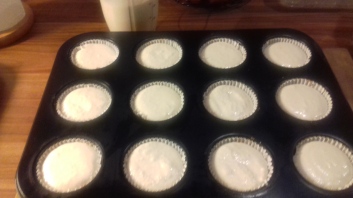
  9. Freeze for 4 – 6 hours. (overnight is fine)
  10. Allow to soften for 10 minutes at room temperature before serving.


Notes:

  • This recipe is adapted from the absolutely amazing Minimalist Baker.
  • For my readers in Korea, cashews are readily available in most supermarkets, as are dates, which are used in the popular chicken dish , ‘Samgyetang / 삼계탕’. (I love the Korean word for ‘date’, ‘dae chu / 대추’, it’s sounds as if I started to say ‘date’ but was interrupted by a sneeze! Love it!)


20161222_015100

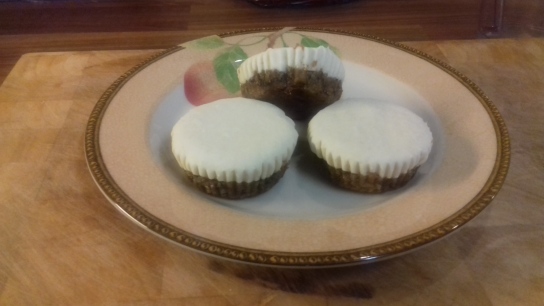
Looks oh so innocent but tastes oh so sinfully delicious!!


Mince Pie Primer 3 : The Pastry

Now that we have the candied peel, and the filling, it’s time for the make or break element – the short crust pastry.  I say make or break because when you have gone to all the trouble of taking raisins, apples and candied peel and marinating them in a delicious concoction of fruit juice, brandy and brown sugar, what a crime it would be to encase them all in a pastry that is merely…..meh.

So, today, for your delectation, I present you with not one, but TWO pastry recipes, (depending on the ingredients available to you) which will make a pastry worthy of casing our decadent filling!

The first recipe is an absolute favourite of mine, for the simple reason that it was the first time I properly mastered pastry. Before that all my efforts were decidedly meh. I had pretty much given up on pies altogether! No one wants to inflict pathetic pastry on their friends and family after all!  Thankfully  a few years ago I had a light bulb moment when I remembered that my absolute favourite pastry to eat was the one used in my Mum’s Finnish Meatloaf.(More on that perfect winter comfort food in a later post) I dug out her fabulously 1970’s ‘The Cooking of Scandinavia’ and discovered that the magical ingredient was sour cream.

NOTE: Now that we have the right ingredients, there are two key points in the method to ensure great pastry.

  1. Just CHILL people!  You’ve heard of the phrase “Cold hands, warm heart”? Well, for us bakers it’s, “Cold hands, great pastry”. For the best results you want cold hands, cold butter, and, for a killer tip which I learned from my Nana, instead of a rolling pin, use a wine bottle filled with iced water! 😉
  2. Both of today’s recipes call for the pastry to chill for an hour. This is VERY important as it allows the butter to harden again, which we need for the flakiness, and it gives the gluten in the flour time to relax, making the dough easier to work with. It also results in a firmer dough, which we want to hold in the syrupy, gloopy goodness of the minced fruit.
  3. If the stores in your area don’t stock sour cream, crème fraiche or Greek yoghurt, then skip down to the Buttermilk Pastry recipe – the stores won’t have THAT either! But you can make your own!  Simply pour the desired amount of milk into a jug or bowl and add one tablespoon of lemon juice or vinegar (white, cider or rice NOT malt). Most recipes say to allow the mix to sit for 5 – 10 minutes, but honestly, the longer you leave it, the better the texture.

Sour Cream Short Crust Pastry

(This is enough for a 9 inch pie or 24 mince pies)

Ingredients:

2 cups / 240g Plain flour

1 tsp of salt (omit if using salted butter)

1/2 cup of Sour Cream OR Créme Fraiche OR Greek Natural Yoghurt

225g of Unsalted butter (chilled and cubed)

Method:

  1. In a large bowl, whisk together the flour and salt. (Unless using salted butter)
  2. Sprinkle in the cubes of butter and crumb together using a fork or your fingers.
  3. Add the sour cream or alternative to the mix, using a fork.
  4. Knead the dough into a ball. Cut in half and form into discs. Dust with a little flour and wrap tightly with plastic wrap / cling film / saran wrap. Chill in the fridge for at least an hour or up to a whole day. (If you need to freeze the dough, wrap in an extra layer of foil and freeze, then allow to thaw overnight.)
  5. If the dough has been in the fridge for more than 2 hours, let it sit for 5 to 10 minutes at room temperature before beginning to work with it.
  6. Knead the dough for 3 to 5 minutes on a floured surface, then roll out and shape as necessary.

********************************************

Buttermilk Pastry

2.5 cups / 300g plain flour

1 tsp salt (if using unsalted butter)

1 cup / 226g Unsalted butter (chilled and cubed)

2/3 cup / 160ml buttermilk (also chilled)

Method:

  1. In a large bowl, whisk together the flour and salt. (Unless using salted butter)
  2. Sprinkle in the cubes of butter and crumb together using a fork or your fingers.
  3. Add the buttermilk to the mix,little by little, and work in with a wooden spoon.
  4. Knead the dough into a ball. Cut in half and form into discs. Dust with a little flour and wrap tightly with plastic wrap / cling film / saran wrap. Chill in the fridge for at least an hour or up to a whole day. (If you need to freeze the dough, wrap in an extra layer of foil and freeze, then allow to thaw overnight.)
  5. If the dough has been in the fridge for more than 2 hours, let it sit for 5 to 10 minutes at room temperature before beginning to work with it.
  6. Knead the dough for 3 to 5 minutes on a floured surface, then roll out and shape as necessary.

Mince Pie Assembly

Preheat your oven to 200°C or 390°F.

Grease your muffin tray and dust with flour. (Do not use paper muffin liners, as they will stick to the syrup from the mince pies and you will be left trying to peel the paper off as if they were throat lozenges which have been forgotten in your bag for a few months!)

Using a round cookie cutter or a floured glass, cut out pastry circles to fit the muffin tin.

Fit them into the muffin tray and fill each one with 1 – 2 teaspoons of the mincemeat mix.

mince-pie-prep

How you top them is completely up to you, the old traditional circle, lattice top, star…..go nuts!

If you don’t have a muffin tray, don’t deprive yourself of this succulent treat, simply size up and use your regular 9 inch pie dish to make a massive monster pie! Nom. Nom.

large-mince-pie

Brush the pastry top with a little milk and bake in the oven for about 20 minutes.

(Baking times will vary depending on the size of your oven, so check on the progress after 15 minutes and watch carefully)

Serve with whipped cream……OR if you want to give your foreign friends a real look at the utter debauchery of an Irish / British Christmas…..whip up some Brandy Butter!!

Brandy Butter

Ingredients:

  • 125g unsalted butter, softened
  • 125g icing sugar
  • 2 tbsp boiling water
  • 3 tbsp brandy

Method:

  1. Cream together the butter and the icing sugar.

  2. Beat in the boiling water and brandy until smooth.

  3. Chill until needed and serve with mince pies.

Merry Christmas my lovelies!!

Mince Pie Primer 2 – The Lush Filling

mincemeat_from_flickr_user_stuart_caie

O.K my lovelies, today we crack on with that most scrumptious of Christmas treats – the Mince Pie! Now that we have the candied peel,  we can make the filling.

Now I give you fair warning – this recipe makes a LOT of Mince Pie filling. 2.75 kg to be exact. Good old Delia Smith, she doesn’t do things by halves!

This has never been a problem for me because, well….I’m a baker, busiest time of year and all that. Though in the spirit of full disclosure I should probably point out that these mince pies are so flippin delicious that I probably would finish this off by myself! However, I hasten to add, that in a season filled with parties, mixers and work do’s, you can quickly become immensely popular by handing out these treats like candy on Halloween!

If, for some frankly incomprehensible reason, you do NOT want your apartment to be overflowing with these delectable morsels, simply halve the quantities of the ingredients.

NOTE:

  1. This recipe calls for shredded suet. This is a type of animal fat which helps to preserve the mix for several months. Useful for super organized people who start their Christmas baking in September. For us mere mortals who only bake a week or so ahead, butter will do the trick nicely.
  2. The recipe also calls for a mix of raisins, sultanas and currants, three different varieties of dried grape. But good luck finding sultanas or currants in Korea. Happily, just using raisins is still insanely delicious.
  3. If you don’t have Mixed Ground Spice you can: A) beg a French friend for some ‘quatre-épices‘, or B) make your own with 2tsps of cinnamon, 1/2 tsp of nutmeg, 1/2 tsp of ginger, 1/2 tsp of ground cloves and 1/2 tsp of coriander.

Ingredients:

450g  Apples, chopped but not peeled

225g  Shredded suet or butter

350g  Raisins

225g  Sultanas                                 Or 800g  of raisins only

225g  Currants

225g  Candied Peel

350g  Soft brown sugar

50g  Sliced almonds

4 tsp  Mixed Ground Spice*

6 tblsp  Brandy or Cognac or Whiskey

1/2 tsp  Cinnamon

1/4 tsp  Nutmeg

Grated zest and juice of 2 oranges

Grated zest and juice of 2 lemons

Method:

In a large bowl mix together all the fruits, spices, zest and juices.

Melt the butter and add to the mix. Stir in the brandy / whiskey / whatever your having yourself.

Allow the fruit mix to soak overnight before assembling the mince pies.

(I’m back in Ireland now and feeling nostalgic for Korea, so I’m going to swap out some of the apple for persimmon. I’ll let you know how it goes. 😉    )

Tune in tomorrow for my gorgeously flaky short-crust pastry recipe!

Merry Christmas my lovelies!


Mince Pie Primer – Candied Peel

Christmas is almost upon us, a holiday which can often be difficult for ex-pats, so far from home and family. When we are homesick, familiar traditions and foods take on an extra importance. I remember one Christmas in Korea, being brought to happy tears at an unexpected sighting of Brussel Sprouts at a buffet!  If you are Irish or British, it is impossible to imagine Christmas without the humble Mince Pie.  Sadly, if you are outside of Britain or Ireland, it is likely impossible to find a Mince Pie.

Never fear dear Readers! O’GradyLady to the rescue.  Over the next three days I will show you step by step how to make your own!   (I will post the complete process on Wednesday)

Today, we will start with the most difficult to find ingredient – Candied Peel.

If you are extremely lucky, you may live in a city with a bakery supply store which stocks candied peel, (Seoul, Busan and Ulsan have such miraculous places – if you are unsure, check your local ex-pat group on Facebook)

If, however, you don’t have the luxury of buying it, don’t worry, it is not difficult to make.

NOTE:  This recipe is very simple, but it is not quick.  Don’t resent the amount of time it takes, but rather embrace the opportunity to step back from the frenetic pace of life and spend a few hours inhaling the delightful citrussy scents of Christmas. Put on a Christmas movie and indulge in some down time.

Ingredients:                                                                             Equipment:

3 oranges                                                                                      Medium saucepan

2 lemons                                                                                       Spoon and a sharp knife

1.25 cups of sugar                                                                       Baking parchment

1.5 cups of water                                                                         Cooling rack

Method:

Juice the bejasus out of the oranges and lemons, reserving the juice for the fruit mixture we will be making tomorrow.

20161217_153035

Remove the pith (the white stuff) from the fruit rinds. Use a spoon or a sharp knife, as you prefer. (I like to use a sharp knife, hence the need to binge watch something in English. Sharp knives and subtitles do NOT mix!)

20161217_162749

Place the rinds in a saucepan and fill with enough water to cause the rinds to float. Bring to the boil and simmer for 10 minutes.  Pour off the water.

Repeat this step two more times.  This process is important for removing the bitter oils from the rinds.

After the third simmering, remove into a dish and allow to cool completely. Clean the saucepan immediately, before any residue hardens, as you will be using the pot again later.

Once cooled, cut the rinds into thin strips using a scissors.

20161217_201409

(I know, I know. They look like carrots and parsnips Julienne, but trust me, you are one step closer to Christmas in your mouth!!)

Taking your clean saucepan, add the 1.5 cups of water and the 1.25 cups of sugar. Bring to the boil and simmer for 5 minutes.  Add the peel.

20161217_222348

DO NOT STIR!!  This is important, you need to let the sugar be! Go sit down and have a cup of tea. Watch ‘It’s a Wonderful Life’.  Check the pot from time to time to make sure it is not burning, but do it with your hands behind your back.

Simmer until the sugar syrup has reduced down to only a few spoonfuls.

20161217_230714

The next part is the most time-consuming, but also my favourite part! This is where I get to unleash my inner five-year-old and indulge in some sticky, gooey macramé art! Heh heh.

Cover your cooling rack with the baking parchment. (If you don’t have a cooling rack, use the wire rack from your oven.)  Using a fork (chopsticks are also handy) put the candied peel onto the baking parchment.

Now for the fun part! Using your hands, and working as quickly as you can before the syrup cools and hardens, spread the peel piece by piece and flattened, across the parchment paper.

20161218_000002

Doesn’t that look pretty! And the smell is just wonderful!!

Wash off your stupendously sticky hands and pat yourself of the back for a job well done!

Allow to dry overnight and then cut to your desired size the next day.

Think of it like marmalade – some people like Fine Cut and some like Thick cut – it’s completely up to you.

Tune in tomorrow as I show you how to make the rest of the fruit filling, and on Tuesday I will share my killer recipe for the short crust pastry!

Merry Christmas my lovelies!!